Slidewiki Developer Blog

The Wisdom of Crowds


Authorization - OAuth, API and users

Aug 16, 2016

Using social logins for user management and OAuth2 for API authorization - reverse OAuth authentication

We are using NodeJS, MongoDB, Kong, React and flux.
We have the desire to use existing accounts on other plattforms in order to do user management on our platform and to secure our API via OAuth2. We investigated OAuth2, social login, existing software, protocols, blogs, ... Thus we come up with the following workflow:

    Workflow overview
  1. The new user does a login with his/her favourite social platform, e.g. facebook or github, in the frontend via OAuth2 (and the UI of the social provider). This is done with the grant type Authorization Code.
  2. The OAuth flow is directed through the middleware via authorization code. After that the middleware requests and stores the tokens in order to reuse them without making them visible in the client.
  3. When the middleware gets valid OAuth tokens from a social provider, it requests general user information via the social providers API. As a result these information are saved in a database. We save them there because a user should be able to use multiple social providers for his/her distinct SlideWiki account. Also with these tokens we are able to make an extended usage of the APIs of the social providers, e.g. using google docs for import and export.
  4. We are using Kong for our API OAuth2. This software have to be configured with each new user. For this we are sending HTTP requests to the admin API of Kong in order to create a consumer and an application. Thus we have user information in the database and our Kong instance configured.
  5. Now we are able to retrieve an access token for our API from Kong and save it in the database. This token is also send to the frontend and stored in there.


Realization:

1. and 2.

The first idea was that we just do the HTTPS requests manually as the social provider demand. For our workflow we need the authorization code workflow of OAuth2 as descriped here. As I started implementing I started with facebook. There I saw at the documentation that it is possbile. In order to prevent future pitholes I checked this also for github, twitter, ... Twitter just support OAuth 1.1 or OAuth2 with client credentials. Github is easy to use. Google has its library and no documention about manually OAuth2. For every social provider we need an authorization endpoint. Thus it is a good idea to use a module which works well with hapi, our module for the service endpoints. Also our frontend is nodejs, so it could also be used there. But there we have express instead of hapi. So a module with support of both will be best. We investigated the modules on npm and the result was that we will use grant for OAuth2 and purest for a general API usage like getting user information. grant is very easy and intuitive! With it you just configure your providers (with credentials) and the path where the token will arrive. So the frontend redirects the user to your service (with the provider in the path) and grant handle the OAuth(2) with social provider UI for you. Grant workes well with google and github, but at the moment we don't get refresh tokens from every provider (at least google does). For a few providers like google, special parameters of the OAuth2 requests are neccessary to set. But grant does not capture this. The most of the work in this step is to create applications on each social provider, because you need a developer account for that. Github could be used with IPs but Google needs domain names for redirect URIs. Also Google needs a list of trustworthy clients which will use OAuth. Another thing which is different for each social provider is the scope parameter. They depending on the API of each provider and have to be configured manually.

3.

As mentioned we are using the NodeJS module purest for this. It helps using the API of multiple providers. While using it for github and google, it seems that it does not the correct handling of the APIs. For example github needs the User-Agent header and google has URLs which are not available in purest (you have to use the absolute URL). But its manageable, if it will not change frequently. So we are getting user information like the name, an id, the location, a URL and a nickname. Github refuses at the moment to give me my email address. Now we have to store (or update) the user information in the database.

4.

The NodeJS module request is suitable for that purpose, especially because Kong examples are using it. For this much code is needed because the URLs, payload and return is mostly quite differently. But it works well!

5.

With purest we get our token from Kong, save it in the database and redirect to the frontend with the token and a few user information in the headers.


Prospects

This will be activated after the first september release. As Kong should protect our API it have to be the proxy for all services. The most of the services will be protected with OAuth2, but a few should be accessible for everyone without a token. (or perhabs a standard token) Also our servies are talking with each other where we need client credential for their OAuth2 authentication. In order to realise this we will configure Kong and enhance it with plugins for better scope management. E.g. one plugin adds the user group as header to every accepted request. As this seems kind of easy, it will be more complicated in the future. For fast deployment, scalability, failovers, high availability and because it is the right way, we are using docker for each service, database, Kong instance - all.


1st SlideWiki Developer Hackathon, 21-22 July, Amsterdam

Jul 27, 2016

Our first SlideWiki developers meeting took place July 21-22 in Amsterdam, with 17 SlideWiki-developers from all over Europe attending.

Day 1


Warm-up programming game: the main idea was to warm up developers by hacking some parts of the existing code base (not to be very competitive but more fun!). To fulfil the requested tasks, people needed to understand different parts of the architecture (e.g. ReactJS, Flux Data Flow and Fluxible). You can play the game yourself by cloning the repository from GitHub.


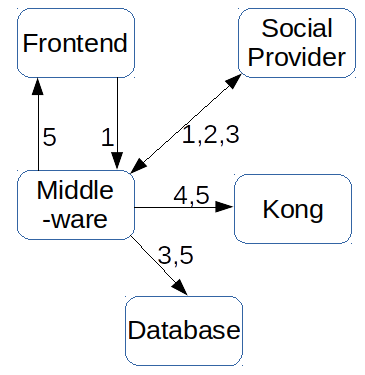
Quick overview of communication in system : This presentation showed developers how different parts of the system work together and how data flows between those parts using an example scenario. See the presentation here or below:


work1 branching

Discussion on version management: We agreed on a minor modification of our current approach.

Pair-programming on development tasks and deck-microservice: A large part of the Hackathon was reserved for development. Being all together we could effectively use each other's expertise, and help each other out by programming in pairs, or even by gathering with four or five developers to work on a task or problem. The close collaboration accelerated development and allowed us to identify many solutions to problems and new challenges that we had to discuss.


Day 2

Core tasks for September release: We discussed the resource planning for our September release. We have to work on development tasks that are interdependent, and the resource planning allows us to take these dependencies into account, together with the availability of developers during holiday-season.

Pair programming on implementing deck-services and user management: This was one of the most productive sessions where we started to further implement the main deck-service API and user management services in the SlideWiki system.


storyboard1

Discussing the storyboard workflow (order of pages) for core development tasks: In a break-out session several developers discussed how user management pages should be ordered and presented to the end-users, and what the required changes in the current user interface should be.

Developers Meeting: Our weekly developer meeting was on location this time. We had several useful activities:

  • Scrum stand-up (what is everyone working on? how did it go? what will we do next?)
  • Scrum demo (presentation of work done) and
  • Scrum retrospective (feedback from team-members on process, tools, people, etc.).

In summary: we got many things done.

Looking forward to next time.


feedback standup2 Written by Klaas Andries de Graaf

slidewiki/devserver - Run the SlideWiki Platform out-of-the-box

Jul 26, 2016

The SlideWiki Platform will be delivered as a ready-to-run Docker container. But Docker can also help in simplifying development. Based on the runtime image for the platform we have developed a dynamic version that makes it possible to edit the source code and hot-deploy your changes each time you save it. The image that is available from Docker Hub as slidewiki/devserver mounts the source code of the platform from your host filesystem and monitors changes, restarting the server each time a file is updated. This gives you the ability to use your development environment to develop in SlideWiki without the need to install the NodeJS ecosystem. You only need the source code and the devserver image in order to run the platform.

Starting the devserver

When starting the devserver image you need to provide the absolute path to the slidewiki-platform project directory (pointing to volume locations in Docker always needs absolute paths). Also you need to provide a port on your host to bin the container’s nodeJS application port to. A typpical invocation looks like this:

docker run -it --rm --name swdev -p 3000:3000 -v /absolute/path/to/project:/nodeApp slidewiki/devserver

by default*, you should be able to see the running platform at http://localhost:3000

  • If you are on Mac OS, you still might need to check the settings for the environmental variable DOCKER_HOST and use the correct host like e.g. http://192.168.99.101:3000

Microservices

In the /configs directory in the project there needs to be a file that configures the location of the microservices (microservices.js). We provide a file called microservices.sample.js that lets the platform use the microservice instances at our testing servers. The container startup script will copy the sample file to the configuration file in case that microservices.js is not exsting. So unless you want to use your own microservice instances you just don’t need to care about :)

Issues with Windows

Most displeasingly the devserver image does not work on Windows hosts as of now. The reason is that the container runs npm install on startup in the project directory. Since the project directory resides in the Windows host filesystem it fails to create symlinks when installing the dependencies. The bug is known and filed as SWIK-286

Benjamin Wulff


Jekyll

May 20, 2016

Extending our developer website with a custom blog


As a catchy introduction for developers we created the SlideWiki GitHub page slidewiki.github.io. Because GitHub is a dream of a developer platform, we also wanted to use it to publish our upcoming inventions and hacks. Thus Jekyll is the best solution in order to work with GitHub pages and multiple developers who want to publish content.

The following will descripe how Jekyll is used, how to write your Jekyll blog locally and why we don't use jekyll-bootstrap.

For me Jekyll is the same for GitHub pages as SASS is for CSS. You write your content with help of the engine - e.g. modularity, reusability, linking - and it's parsed with the engine to your static content. So you define the style, structure and handling depending on the type and metadata with Liquid, tag it and write pages which contains or link your glistening blog entries.
At the moment we have two pages, one as the entry point with the whole overview of what we think is interesting and the other, which lists all blog entries. These are written in HTML and include both the well know Bootstrap within JQuery and Font Awesome. The blog entrys are written in HTML as well to use the same style as the two pages. We make use of the layout and include mechanisms provided by Liquid but we not using SASS right now.

In order to add your blog entry

  1. clone the repo: git clone git@github.com:slidewiki/slidewiki.github.io.git
  2. Add your new blog entry: cp _posts/2016-05-19-example-post.html _posts/YYYY-MM-DD-name.html
  3. Change the metadata and the content with your favourite editor. Verify that your personal details are given in the _config.yml file and you are using your abbreviation in the "author" YAML metadata attribute.
  4. Preview it with docker: docker run --rm --label=jekyll --volume=$(pwd):/srv/jekyll --privileged=true -it -p 4000:4000 jekyll/jekyll
  5. If you are satisfied with it push it to the repo: git commit -am "Added blog entry about \"foobar\"" && git push

As we are using Bootstrap on Jekyll we also took a look at jekyll-bootstrap in order to have Bootstrap built-in. Unfortunately it does not work well with the Jekyll docker container out of the box and it is too heavy at the moment. We will reconsider using it as soon as this blog will be migrated or should be extended with more features.


Example Post

May 19, 2016

Large-scale pilots for collaborative OpenCourseWare authoring, multiplatform delivery and Learning Analytics.


This project has received funding from the EU Framework Programme for Research and Innovation Horizon 2020 under grant agreement no 688095.


Disclaimer:

The contents of this website do not reflect the official opinion of the European Union. Responsibility for the information and views expressed therein lies entirely with the authors.